Riding the crosscut…
September 23, 2012
I built a crosscut sled to improve on the not so accurate miter fence of my table saw for repeated 90 degree cuts. The original aspiration was to build The Super Sled. Given that I had only block-board, a small piece of melamine finish plywood and no motivation (money) to go buy some clean new pieces of ply, the plan was scaled down to try and first achieve a simpler design and make it even simpler if possible.
This is the final result…
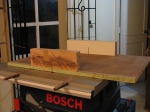

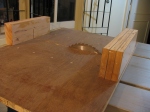
The runners are from a length of Sal I have, the fence is three laminated pieces of 3/4 in plywood with melamine finish and the back support is a thick leftover piece of Beech from when I made a pair of speaker stands.
Performing an accuracy check on the squareness using the 5-cut method gave me an error of about 0.3 mm for a linear 100 cm for the left side of the fence and an error of 2.2 mm for a linear 100 cm for the right side. The difference is because there is a slight warp in the melamine plywood towards the very right edge. I can live with the error as long as i remember not to make cuts longer than 25cm (error of 0.55 mm) using the right side of the fence. I will graduate to a better sled soon but this will do for the time being.
Eager to put the crosscut sled to the test I decided to humor the wife with a simple small shoe rack to fit cozily in corner space behind the main door. I used a piece of recovered block-board shelving to cut equal width wood strips with varying lengths and screw/glue them together.
Here is the SketchUp model and this is what it looks like…

Since this is going to be for rough use and I did not have my sander handy for the time being I have just left it as is, burn marks and all. Now it sits in the corner just barely large enough to hold the shoes and slippers…

Ramping up…
September 11, 2012
I built a table-saw stand with casters making it easy to move around. Since I work outside in the front parking + garden area I built a ramp to be able to roll it all the way outside without requiring any lifting of the saw. Later I plan to build a tool trolley and router table on casters as well.
I assembled the ramp using the same slotted angles I used for storage racks. The floor boards I cut out of two 6 ft doors.
-

- The basic skeleton for the ramp
-

- The ramp floor is composed of three separate pieces. Lowermost in place.
-

- The boards all have a cleat on the back to hook into the skeleton cross supports
-

- The topmost board attached. Houston the ramp is operational
-

- I wonder if the ramp can do double duty as a slide if there are small kids around.
The top and the bottom boards have an additional quarter piece attached to them via hinges. This gives them some freedom of movement while resting on the floor to compensate for the flexing that occurs when weight passes over the ramp.
Let the good times roll…
September 10, 2012
I don’t have a permanent workshop setup, however between my study, the front parking + garden area and the rear utility space, there is more than enough space for me to work.
But not having a permanent setup means having to setup, work, clean and restore everything every single time. Every time I want to work with the table-saw (which is almost always) I have to first carry my workbench out front and then carry the table-saw and put it on top of the workbench. There are multiple problems with this process. It is time consuming and tiring for one, I lose the use of my workbench and most importantly if I keep it up then I am probably going to throw out my back one of these days. Solution: make a mobile table-saw stand and a ramp over the front steps to roll it out and back in without ever having to lift it.
Here is my table-saw stand in all its blue glory.

It took over 3 weekends and several weekday evenings to complete. I spent a lot of time trying to figure out how to build one using just the block-board I reclaimed from my friend who did a interior makeover and threw out all the existing wood.
Block-board is good when used as large flat pieces to make things like doors, tops, shelves, etc. Its structural strength is limited, traditional joints cannot be done with any measure of reliability, it needs to be glued and screwed/nailed together, one needs to be careful when putting screws into it since there are gaps in the softwood cores sandwiched between two thin plywood sheets and only screws into the face will hold well with some degree of reliability. Additionally the stuff I had recovered was cracked & warped and full of nails.
So it was quite a task cleaning up the nails, cutting away the bad portions and then using what was left in a manner that would be strong(ish) for the purpose of holding the table-saw
As part of building this stand I learned/experimented with the following:
- Using SketchUp for modeling
- Ripping large panels of wood single-hand and without the aid of the rip fence
- Repeated cross and miter cuts using the miter fence
- Bevel cuts by tilting the table saw blade
- Sanding, priming, painting
- Epoxy filling to make repairs
The stand is made up of 44 individual pieces not including the casters. Here is the model file – TableSawStand.skp (the actual saw-stand is hidden, to view it unhide it in the outliner)
With the stand ready I then built the ramp so that it can be rolled in and out of the front door, but that is a story for another post.
Making more space…
September 10, 2012
With more space comes more clutter…
I managed for a short while after doing my first round of very rudimentary organization (Making space)
Then good fortune shined when a friend decided to completely redo his home interiors. His interior designer categorically ripped up and discarded nearly all existing furnishings. The good soul offered the chance to come and reclaim anything that might be of use. Two trips and I now have a whole bunch of old wooden doors and kitchen cabinet doors and plywood backing and cabinet shelves and cupboard drawers… a lot of used wood.
Since a lot of it was quite literally ripped out and not dismantled there are many pieces with torn out edges, long cracks running across, twists & sags and nails & screws & handles & hinges. Also almost all of it is average quality blockboard. But I am drifting… the fact is that all this stuff was finally dumped in my room taking up entire corners and the entire floor space in my room. End result back to square -1.
I became very good at tiptoeing over stuff and my maid refused to grace my room with her all powerful broomstick. I kept putting a second round of organization off until I completed my table saw stand which took so long since I was treating it as an experimental project for trying out new stuff.
Finally with the table saw stand done I decided to get down to cleaning up. So I went to S P Road and picked up a bunch of slotted angles to make relatively inexpensive and strong racks. Overall dimensions: H x L x D – 7 ft x 4 ft x 2 ft, with 5 shelves
This is the final result…

The before can be visualized by taking all the vertically piled stuff and putting it all on the ground in the entire floor space shown in the photograph. The shelves are actually the cabinet doors recovered from my friends place lying across the slotted angle skeleton. You can see the table saw stand I made standing on the right.
I was happy with the result and the strength of the final structure. So I went ahead and got more of this stuff to make storage space in my small front entrance parking space. That is where I store the long doors and small wood scrap and stuff.
A photo of the outside storage shelves. Overall dimensions: H x L X D – 3 ft x 7 ft x 2 ft

